Introduction
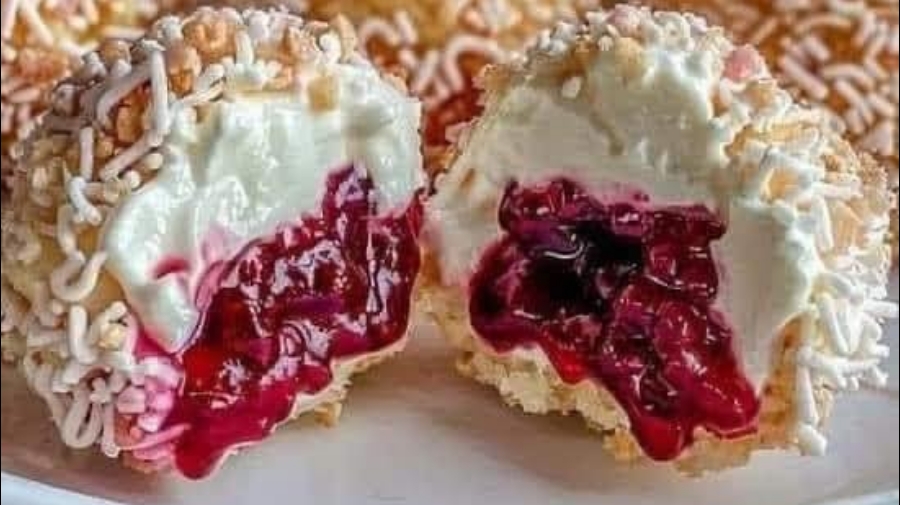
Looking for a sweet, irresistible treat that’s both easy to make and looks stunning on any dessert table? These coconut and jam balls are the perfect combination of creamy, crunchy, and fruity flavors. In this blog post, we’ll guide you through a simple recipe that will leave your guests asking for more. Whether you’re preparing a special occasion dessert or a simple snack, this treat is bound to impress. Let’s dive into how you can make these delightful coconut-covered jam-filled balls!
Ingredients
Before starting, gather these ingredients for a smooth cooking experience:
- 2 cups of shredded coconut
- 1 cup of sweetened condensed milk
- 1/2 cup of butter (softened)
- 1/2 cup of powdered sugar
- 1/2 cup of raspberry or strawberry jam (or any jam of your choice)
- 1/4 cup of crushed nuts (optional)
- 1/4 teaspoon of vanilla extract
- Pinch of salt
Instructions
- Prepare the Coconut Mixture
In a large mixing bowl, combine the shredded coconut, sweetened condensed milk, softened butter, powdered sugar, and vanilla extract. Mix them thoroughly until a dough-like consistency forms. If you’d like a bit of extra texture, add in crushed nuts like almonds or pistachios at this point. The dough should be sticky but firm enough to hold its shape. - Form the Coconut Balls
Once your mixture is ready, take small portions of the dough and roll them into balls, about 1 to 1.5 inches in diameter. Be sure to press the mixture firmly so that the balls hold together when handling. - Create the Jam Center
Gently press a small indentation into the center of each ball using your finger or a small spoon. Carefully fill the hole with a teaspoon of your favorite jam. Raspberry or strawberry jam works wonderfully, but you can use any fruit preserves you enjoy. Once the jam is added, gently seal the hole by rolling the ball again, ensuring that the jam stays inside. - Coat the Coconut Balls
Roll each jam-filled ball in a bowl of shredded coconut, ensuring it is completely coated. This will give your treats that signature crunchy and sweet coconut exterior. - Chill the Balls
Place the coated coconut balls on a parchment-lined tray and refrigerate them for at least 1 hour. This will help them firm up, making them easier to handle and enhancing their flavor. - Serve and Enjoy!
After the chilling time is up, your coconut and jam balls are ready to be served. These treats are perfect for any gathering, and their beautiful presentation will have everyone asking for the recipe!
Why These Coconut and Jam Balls are a Must-Try
Not only do these coconut and jam balls taste absolutely amazing, but they are also versatile. Here’s why you should try making them:
- Simple Ingredients: With just a few pantry staples, these jam-filled coconut treats are a breeze to make.
- Kid-Friendly: Children love the combination of sweet coconut and fruity jam. This is the perfect snack for parties or school events.
- Customizable: Feel free to experiment with different jams or even chocolate coatings. You can personalize these treats to match your preferences.
- Perfect for Any Occasion: Whether you’re hosting a birthday party, a holiday gathering, or just want a special treat, these coconut balls are the perfect dessert choice.
Tips for Making the Best Coconut Jam Balls
- Use Quality Jam: The flavor of your jam will greatly influence the overall taste of these coconut balls. Choose a high-quality, flavorful jam for the best results.
- Chill Before Serving: The coconut balls taste best when chilled, so don’t skip this step! Chilling also helps the balls hold their shape better, making them easier to serve.
- Experiment with Coatings: Instead of just coconut, you can coat the balls in chocolate, crushed nuts, or sprinkles for a different twist.
- Storage: Store the coconut balls in an airtight container in the refrigerator for up to a week. They also freeze well for longer storage.
Conclusion
These coconut and jam balls are a delightful, easy-to-make dessert that everyone will love. With their creamy coconut exterior and sweet jam center, they are sure to be a hit at any occasion. Whether you’re preparing them for a party or simply treating yourself, this recipe is guaranteed to impress. Happy baking!
